こんにちはフロントエンドエンジニアのまさにょんです!
今回は、Dockerで Nginx の環境構築をする方法と基本設定について、ハンズオンで解説していきます。
目次
Dockerで Nginx の環境構築をする方法と基本設定(ハンズオン)
実務で、Docker 上で展開している Nginxの設定をカスタマイズする必要がでてきたので、
Docker でNginx の環境構築をしながら、Nginxについて学んでいきます。
参考・引用している Docker による nginx の導入と基本設定 の記事は、わかりやすく感謝です。
今回、作成する Nginx 環境のディレクトリ構造
今回、作成する Nginx環境のディレクトリ構造をtree -aで確認すると次のとおりです。
Nginx_Test % tree -a
.
├── docker-compose.yml
└── html
    └── index.html

2 directories, 2 files
Nginx を構築するディレクトリを作成する
次のコマンドで、Nginx を構築するディレクトリを作成します。
mkdir Nginx_Test && cd Nginx_Testdocker-compose.yml を作成する
次のコマンドで、プロジェクトのRoot にdocker-compose.ymlを作成して開きます。
touch docker-compose.yml && open docker-compose.ymlopenしたdocker-compose.ymlの内容は、次の内容をコピペしてください。
YAMLファイルは、JSONと違いコメントができるので、コメントを記載していきます。
version: "3.8"
services:
  # Nginx (Web-Server)
  nginx:
    container_name: "nginx"
    image: nginx:1.19
    ports:
      - "80:80"
    # 公開するhtmlのDirをvolume_mount => local_html_dir:nginx_container_html_dir
    volumes:
      - ./html:/usr/share/nginx/html
Nginx(Webサーバー)で公開する HTMLを作成する
続いて、Nginx(Webサーバー)で公開する HTMLを作成していきます。
まずは、htmlディレクトリを作成します。
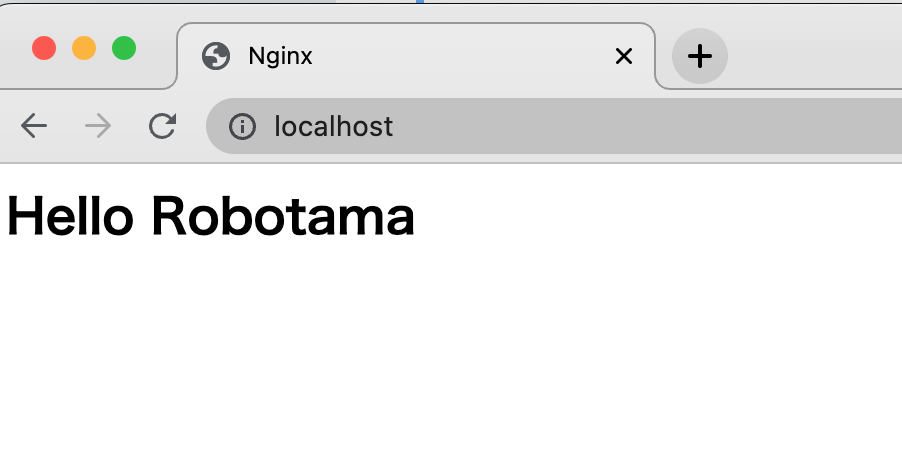
mkdir html && cd htmlそしてechoで index.htmlを作成します。
echo '<html><head><title>Nginx</title></head><body><h2>Hello Robotama</h2></body></html>' > index.htmlDocker Container を立ち上げる
ハンズオン通りにやっている場合、今は、htmlディレクトリにいるはずなので、ディレクトリの Root階層に戻ります。
cd ../次のコマンドで、定義したサービス ( Docker Container )をバックグラウンドで立ち上げます。
docker-compose up -d続いてdocker container ps コマンドで、Docker Container の起動状況を確認します。
docker container ps
CONTAINER ID   IMAGE        COMMAND                  CREATED          STATUS          PORTS               NAMES
78a902e1b3f7   nginx:1.19   "/docker-entrypoint.…"   21 seconds ago   Up 18 seconds   0.0.0.0:80->80/tcp  nginx
設定した 80 Portでポートフォワードしていることがわかります。
また、Container名は、nginxになります。
http://localhost:80/ にアクセスすると、作成した HTML が表示されれば、環境構築完了です。
Nginxの基本設定を確認する
Docker Conainer の中に入って、Nginxの構成を見てみます。
docker-compose exec nginx bashDocker Conainer の中で、Nginx Container のディレクトリ構造を確認すると、次のとおりです。
root@78a902e1b3f7:/# ls -al
total 84
drwxr-xr-x   1 root root 4096 Jul  8 03:20 .
drwxr-xr-x   1 root root 4096 Jul  8 03:20 ..
-rwxr-xr-x   1 root root    0 Jul  8 03:20 .dockerenv
drwxr-xr-x   2 root root 4096 May 11  2021 bin
drwxr-xr-x   2 root root 4096 Mar 19  2021 boot
drwxr-xr-x   5 root root  340 Jul  8 03:20 dev
drwxr-xr-x   1 root root 4096 May 12  2021 docker-entrypoint.d
-rwxrwxr-x   1 root root 1202 May 12  2021 docker-entrypoint.sh
drwxr-xr-x   1 root root 4096 Jul  8 03:20 etc
drwxr-xr-x   2 root root 4096 Mar 19  2021 home
drwxr-xr-x   1 root root 4096 May 12  2021 lib
drwxr-xr-x   2 root root 4096 May 11  2021 media
drwxr-xr-x   2 root root 4096 May 11  2021 mnt
drwxr-xr-x   2 root root 4096 May 11  2021 opt
dr-xr-xr-x 241 root root    0 Jul  8 03:20 proc
drwx------   2 root root 4096 May 11  2021 root
drwxr-xr-x   1 root root 4096 Jul  8 03:20 run
drwxr-xr-x   2 root root 4096 May 11  2021 sbin
drwxr-xr-x   2 root root 4096 May 11  2021 srv
dr-xr-xr-x  13 root root    0 Jul  8 03:20 sys
drwxrwxrwt   1 root root 4096 May 12  2021 tmp
drwxr-xr-x   1 root root 4096 May 11  2021 usr
drwxr-xr-x   1 root root 4096 May 11  2021 var
Nginxをカスタマイズする上で、重要なディレクトリ・ファイルは、次のようになっています。
| ファイル/ディレクトリ | 説明 |
|---|---|
| /etc/nginx/nginx.conf | 起点となる設定ファイルで、他の設定ファイルはここから読み込まれる |
| /etc/nginx/conf.d/default.conf | webサーバの設定ファイル |
| /etc/nginx/mime.types | MIME のマッピングファイル |
| /usr/share/nginx/html/ | webサーバのドキュメントルート |
| /etc/logrotate.d/nginx | ログローテーションの設定ファイル |
| /var/log/nginx/ | ログ・ファイルの出力先ディレクトリ |
| /var/cache/nginx/ | キャッシュファイルが格納先ディレクトリ |
Nginxの設定ファイルであるnginx.confを見て見ると、初期設定がわかります。
root@78a902e1b3f7:/etc/nginx# cat nginx.conf

user  nginx;
worker_processes  1;

error_log  /var/log/nginx/error.log warn;
pid        /var/run/nginx.pid;


events {
    worker_connections  1024;
}


http {
    include       /etc/nginx/mime.types;
    default_type  application/octet-stream;

    log_format  main  '$remote_addr - $remote_user [$time_local] "$request" '
                      '$status $body_bytes_sent "$http_referer" '
                      '"$http_user_agent" "$http_x_forwarded_for"';

    access_log  /var/log/nginx/access.log  main;

    sendfile        on;
    #tcp_nopush     on;

    keepalive_timeout  65;

    #gzip  on;

    include /etc/nginx/conf.d/*.conf;
}
nginx コマンド
nginx コマンドは以下のようなオプションがあります。
root@78a902e1b3f7:/# nginx -h
nginx version: nginx/1.19.10
Usage: nginx [-?hvVtTq] [-s signal] [-p prefix]
             [-e filename] [-c filename] [-g directives]

Options:
  -?,-h         : this help
  -v            : show version and exit
  -V            : show version and configure options then exit
  -t            : test configuration and exit
  -T            : test configuration, dump it and exit
  -q            : suppress non-error messages during configuration testing
  -s signal     : send signal to a master process: stop, quit, reopen, reload
  -p prefix     : set prefix path (default: /etc/nginx/)
  -e filename   : set error log file (default: /var/log/nginx/error.log)
  -c filename   : set configuration file (default: /etc/nginx/nginx.conf)
  -g directives : set global directives out of configuration file
nginx コマンドで、よく使うのは、次のようなコマンドらしいです。
nginx -tで設定ファイルをテストしてエラー内容を表示する。nginx -s reload設定ファイルの再読み込みを実施する。nginx -s stop実行中の nginx デーモンを停止する。nginx -s quit処理中のリクエスト完了を待って nginx デーモンを停止する。
【関連記事】『Docker で環境構築した Nginxの設定(nginx.conf)をカスタマイズする方法』
当初の目的であった、Docker 上で展開している Nginxの設定をカスタマイズする方法に関しては、次の記事にまとめました。
Dockerの学習・参考書
参考・引用
最近の投稿
 【SQL】1回のINSERTで、複数行のレコードを一括挿入・一括追加する方法
 JavaScriptでランダムなuuidを作成する方法(randomUUIDの使い方)
 PythonでCSVをJSONに変換する方法
 PythonでCSV・Dataframeを指定の行数まで切り取る方法
 JavaScript(TypeScirpt)のfor-of文でindexの値も取得する方法と、Type IterableIteratorエラーの解決方法
 VSCode上のPython import文の「インポート “XXXXX” をソースから解決できませんでした」エラーの解決方法